Invoicing - View, Add and Edit Invoices
Draft invoices can be created in bulk in either the Jobs to Invoice screen, or Work in Progress Center.
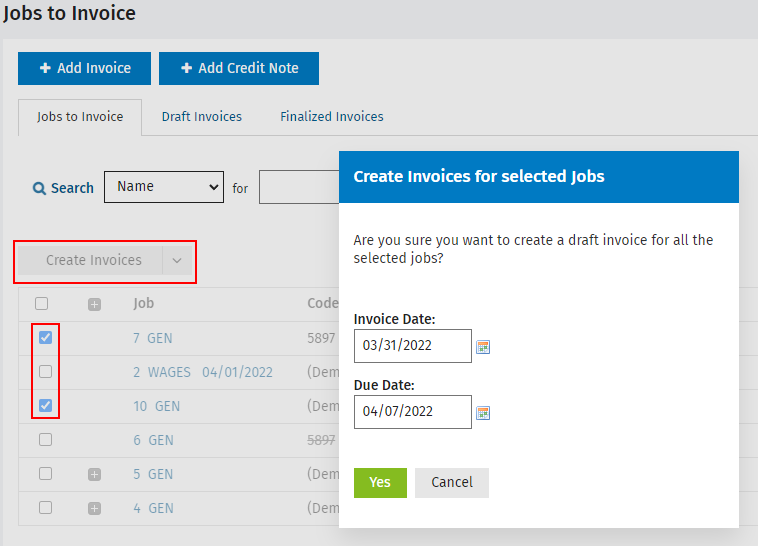
- Click Time and Billing > Jobs to Invoices.
- Jobs are ordered according to job status, showing the most complete first.
- All open jobs and closed jobs with a positive WIP balance are displayed in the grid.
- Click the Search button
 to open the expanded search filters. Use different criteria to create a list of jobs you want to invoice and click Search.
 - For example, if you are using the Currently Responsible status to pass invoicing responsibility to the relevant team member, filter by Currently Responsible.
- Similarly, if you are using the Job Status to identify jobs ready for invoicing, filter by Job Status.
- Select the check boxes of the jobs you want to create invoices for.
- Click Create Invoices to create invoices for all the selected jobs OR click the arrow button
 to view more options and click your preferred option:
 - Click Create Invoices - the jobs are added as WIP lines to the invoices.
- Click Create Invoice with Interim Text - the job is added as a WIP line to the invoice, along with the default interim invoice text related to the job type. This option is only available if you have enabled the interim/progress text on job types setting.
- Click Create Invoice & Close Job - the job is closed and added as a WIP line to the invoices.
If you have selected multiple jobs for the same client, they will appear on one invoice.
- Use the Calendar button
 to select the Invoice Date and Due Date.
 - Click Yes - continue processing the draft invoices in the Draft Invoices tab.

- Click Time and Billing > Work in Progress.
- Click the By Contact Group tab or By Individual Client tab, as required.
- Click the Search button
 to open the expanded search filters > use the different criteria to create a list of the jobs you want to invoice > click Search.
 - For example, if you are using the Job Status to identify jobs ready for invoicing, filter by Job Status.
- Select the check boxes of the clients or groups you want to create invoices for.
- You can click the Expand button
 beside a client code or group name to view all the jobs and select specific ones you want to appear on the invoice.
 - Choose one of these options as required:
- Click Create Invoices - all jobs with a WIP balance are added to an invoice for the client.
- Click the Arrow button
 on the Create Invoices button > click Create Invoices with Interim text - the jobs are added as WIP lines to the invoices, along with the default interim invoice text related to the job type. This option is only available if you have enabled the interim/progress text on job types setting.
 - Edit the default invoice dates, if required.
- Click Yes to confirm.
- Continue processing the draft invoices via the Draft Invoices screen.
You can also expand the Actions menu on a job row > click Create Invoice to only invoice that one job. Jobs with a negative WIP balance are added to an invoice but the amount of the WIP line will be 0.00. If the job is already included on another draft invoice, it cannot be added to a new draft invoice. You are shown a message asking if you want to continue invoicing only the jobs that can be added to a draft invoice.